Label

Senin, 16 Januari 2012

celine dion

Ecoutez-Moi"

[Listen To Me]

Les rues de ma ville sont si belles quand il pleut
Les arbres qui brillent se refletent dans l'eau bleue
Au clair de vitrines ruisselantes d'etincelles
Les gens s'acheminent vers Noel

[The streets of my town are so beautiful when it rains
Glowing trees are reflecting in the blue water
From the light of shop windows streaming of sparkles
People are setting out for Christmas]


Ecoutez-moi, ecoutez-moi
Je veux garder ce monde-la
Ou je suis libre de marcher avec des flots de reves
Entre les yeux

[Listen to me, listen to me
I want to keep that world
Where I'm free to walk with waves of dreams
Between the eyes]


Ecoutez-moi, ecoutez-moi
Il faut laisser le droit de vivre a tous les hommes
De la terre et leur jeunesse aux amoureux

[Listen to me, listen to me
We must let the right to live to every man
From earth and their youth to lovers]


Je crois qu'etre libre c'est de pouvoir refuser
Je crois que mieux vivre c'est avant tout d'etre aime
Pourtant quand j'y pense il y a tres peu de pays
Qui ont cette chance aujourd'hui

[I believe that being free is to know how to refuse
I believe that better living is above all to be loved
But when I think about it, there a so many countries
That have that chance today]


Ecoutez-moi, ecoutez-moi
Je veux garder ce monde-la
Ou je suis libre de marcher avec des flots de reves
Entre les yeux

[Listen to me, listen to me
I want to keep that world
Where I'm free to walk with waves of dreams
Between the eyes]


Ecoutez-moi, ecoutez-moi
Il faut laisser le droit de vivre a tous les hommes
De la terre et leur jeunesse aux amoureux

[Listen to me, listen to me
We must let the right to live to every man
From earth and their youth to lovers]


Ecoutez-moi, ecoutez-moi
Je veux garder ce monde-la
Ou je suis libre de marcher avec des flots de reves
Entre les yeux

[Listen to me, listen to me
I want to keep that world
Where I'm free to walk with waves of dreams
Between the eyes]


Ecoutez-moi, ecoutez-moi
Pour qu'un bonheur soit le plus beau
Il faut encore que les autres soient heureux

[Listen to me, listen to me
For a most beautiful happiness
Others must be happy too]


Ecoutez-moi!
Pour moi je ne demande presque rien
Mais pour tous ceux qui n'ont rien
C'est le droit de vivre que je veux

[Listen to me!
for myself I ask almost nothing
But for all those who have nothing
It that right to live that I want]


buku lama

buku bersihkan tauhid anda dari noda syrik dan karsa mengakkan jiwa gama dalam dunia ilmiah versi ihya ulumiddin ini buku lama ortu ku.... yang udah dari dulu-dulu mo dibaca,, n masih g sempat.. rasanya hari berlalu cepet banget..
kapaaaannnnnnnnnnnn aku bisa bacanyaaaa

Free Felt Patterns and Tutorials: Free Felt Tutorial > Matryoshka Dolls

Free Felt Patterns and Tutorials: Free Felt Tutorial > Matryoshka Dolls: photo by snipsnaphappy Beautiful dolls designed and created by Snipsnaphappy. Click here for the free template and tutorial.

my dream team is juventus

my best team is juventus

cara membuat lilin


Membuat Lilin

Ini cara membuat lilin sederhana, dengan media alas gelas kecil (bukan sebagai cetakan ^_^)

Bahan-bahannya:
Paraffin, Pewarna, parfum (bisa dibeli di toko kimia)
Benang kasur,

Peralatan:
- botol bekas selai, mayones, atau lainnya (cari yang berlubang lebar dan kaca tebal, jangan lupa cuci bersih dan keringkan dahulu)
- panci kecil
- Gelas kecil (transparan jika lilin ingin berwarna-warni)
- Tusuk sate (jika terlalu panjang dapat di potong, tapi harus lebih panjang daripada diameter mulut gelas)

Persiapan awal:
- Ikat benang kasur di tengah tusuk sate
- Simpan tusuk sate diatas gelas
- Atur agar benang jatuh ke dasar dan tetap berada ditengah gelas


Pembuatan Lilin:
- Masukan potongan parafin ke dalam botol bekas
- Isi panci dengan air 1/3 tinggi panci dan letakan botol berisi parafin di dalamnya
- Lalu panaskan dengan api kecil
- Aduk perlahan hingga mencair
- Tambahkan warna, sedikit demi sedikit hingga mendapatkan warna yang dikehendaki
- Angkat panci dari api, lalu tambahkan parfum/aroma ke dalam paraffin
- Tuang paraffin cair ke dalam gelas

Tips:
- agar sumbu lebih tegak, bisa dicelupkan terlebih dahulu ke paraffin cair
- gunakan sendok makan saat menuangkan paraffin cair jika mulut gelas kecil
- Jangan keluarkan botol dari panci berisi air agar paraffin tetap cair

- jika ingin membuat warna berlapis:
Tuangkan 1-2 sendok makan warna A, dinginkan hingga keras 
Lalu tambah 1-2 sendok warna B, dinginkan kembali hingga keras
 
Ulang ke warna A atau ke warna C, dst
- Jika warna lilin ingin lebih bergradasi (bercampur):
Sama dengan proses lilin lapis, hanya saat menuangkan lilin berwarna B tidak usah menunggu lilin berwarna A mengeras
- Jika lilin ingin lebih menarik:
beri tambahan lilin malam berwarna-warni yang biasa dimainkan anak-anak, dan tempelkan pada permukaan dalam gelas (bentuk agar berupa bunga, daun atau lainnya jika dilihat dari luar gelas). Lalu tuangkan paraffin cair (jangan terlalu panas, agar lilin malam tidak ikut mencair)

- Ingat walau lilin berwarna-warni, parfum harus sama
- Sering-sering latihan dan berkreasi agar menghasilkan lilin yang lebih
cantik :)
http://kreasitha.blogspot.com/2007/12/membuat-lilin_12.html

perangko ku

wahh,, akhirnya ketemu juga beberapa perangko2 lama yg dlu kusimpan,, lalu ku edit biar lebih keren.. yg paling bagus ntu perangko dari jepang,,, kreasinya oookkkkzzzz bangget. klo yang dari italia, kebanyak gambar orang n bangunan.... nah, kalo dari india juga macam2, tapi g ada yg gambar tangan....
tapi akibat skrg ada email n facebook, perangko kurang "dijamah" oleh orang.... kasian banget deh si perangko

Free Felt Patterns and Tutorials: Free Felt Pattern & Tutorial > Cupcake Softies

Free Felt Patterns and Tutorials: Free Felt Pattern & Tutorial > Cupcake Softies: photo by Fantastic Toys Sweet little cupcakes designed and created by Fantastic Toys. Click here for the free template and tutorial.

Free Felt Patterns and Tutorials: Free Felt Pattern & Tutorial > Cupcake Softies

Free Felt Patterns and Tutorials: Free Felt Pattern & Tutorial > Cupcake Softies: photo by Fantastic Toys Sweet little cupcakes designed and created by Fantastic Toys. Click here for the free template and tutorial.

bryan adams - "The Only Thing That Looks Good On Me Is You" Ringtone to your Cell


BRYAN ADAMS LYRICS
The Only Thing That Looks Good On Me Is You Ringtone Send "The Only Thing That Looks Good On Me Is You" Ringtone to your Cell The Only Thing That Looks Good On Me Is You Ringtone


"The Only Thing That Looks Good On Me Is You"

I don't look good in no Armani Suits
No Gucci shoes - or designer boots
I've tried the latest lines from A to Z
But there's just one thing that looks good on me

The only thing I want
The only thing I need
The only thing I choose
The only thing that looks good on me...is you

I'm not satisfied with Versace style
Put those patent leather pants - in the circular file
Sometimes I think - I might be lookin' good
But there's only one thing that fits me like it should

The only thing I want
The only thing I need
The only thing I choose
The only thing that looks good on me...is you

Ya it's you - it could only be you
Nobody else will ever do
Ya baby it's you - that I stick to
Ya we stick like glue

The only thing I want
The only thing I need
The only thing I choose
The only thing that looks good on me...is you

Free Felt Patterns and Tutorials: Free Felt Tutorial > Flower Power Hair Clips

Free Felt Patterns and Tutorials: Free Felt Tutorial > Flower Power Hair Clips: photo by Blue Cricket Designs Flower power hair clips designed and created by Blue Cricket Designs. Click here for the free tutorial.

the way you look at me- christian bautista


The Way You Look At Me"

No one ever saw me like you do
All the things that I could add up too
I never knew just what a smile was worth
But your eyes say everything
Without a single word

'Cause there's somethin' in the way you look at me
It's as if my heart knows
You're the missing piece
You make me believe
That there's nothing in this world I can't be
I never know what you see
But there's somethin' in the way you look at me

If I could freeze a moment to my mind
It'll be the second that you touch your lips to mine
I'd like to stop the clock make time stands still
'Cause, baby, this is just the way
I always wanna feel

'Cause there's somethin' in the way you look at me
It's as if my heart knows
You're the missing piece
You make me believe
That there's nothing in this world I can't be
I never know what you see
But there's somethin' in the way you look at me

I don't know how or why
I feel different in your eyes
All I know is it happens every time

'Cause there's somethin' in the way you look at me
It's as if my heart knows
You're the missing piece
You make me believe
That there's nothing in this world I can't be
I never know what you see
But there's somethin' in the way you look at me

The way you look at me

superman-lyric-superjunior

Eunhyuk:
Naega sesang-eso hana bakke eopneun group-eso meotjike chumeul chugo
Unique-han eubchoribeul halttae

Donghae:
Sesang modeun yojeong-deuri naeke
Banhae banhae naeke-ro
Dallyeo-wa dallyeo-wa dallyeo-wa
I sunganeul hamkke jeulkyeo bolkka

Yesung:
Chinchihake joyonghake nareul saranghaejun saramdeureul naneun kamdongshikyeo

Kyuhyun:
Kwanhi heoseburigo solchikhi mothago naeke keureon sunganirago-neun eopseotda

Super junior:
Urin kyumo-do chego
Skill-do chego
Mwodeunji chego animyeon andwae
Super junior-neun wonrae maen jaman ppajin ireum hamyeo himsen tori superman

Yeolkyeong-do chego
Cheongshin-ryeokdo chego
Nuga uril kamhi kkeureo-nael tenga
Super junior-neun wonrae maen jaman ppajin ireum hamyeo himsen tori superman

Heechul:
Cha cha cha da-eum nugu

Shindong:
Keureohke waedeul keureohke dwireul dorabona
Yeoki itneunde na todeche nugureul chatneun geoya
Naega shindong

Leeteuk:
Haneul-e byeorul tada julkka
Se bwa han ke du ke se ke
Urineun wonrae ireobeorin byeoleul habchyeo
Byeori yeol se ke

Heechul:
Keureohjiman na urin wirobji anha
Urin sm family-rang yojeongdeuri itji anha

Ryeowook:
Jujeohajima aeseo wimyeon hajima
Imi chwihaebeorin keudaen superholic

Sungmin:
Noraeul bolleo bwa ijen chumeul ddarahae
Kachi shinake eoshigu cheolshigu

Super junior:
Urin kyumo-do chego
Skill-do chego
Mwodeunji chego animyeon andwae
Super junior-neun wonrae maen jaman ppajin ireum hamyeo himsen tori superman

Yeolkyeong-do chego
Cheongshin-ryeokdo chego
Nuga uril kamhi kkeureo-nael tenga
Super junior-neun wonrae maen jaman ppajin ireum hamyeo himsen tori superman

Kyuhyun & sungmin:
Mami ulcheok halttae norael deulgo sipeul-ttae
Kiboneul dallaejul mwonga piryohal-ttae uriga kyeol-e isseo
Itneun chimkkeot wichyeobwa

Super junior:
Super junior
We are super super superman

Ryeowook & yesung:
Dweke shimshimhalttae internet keomsek halttae
Super chaman chimyeon nawa
Jureureuk jureureuk jureureuk

Eonje-na kyeol-e isseo
Sori chilleo wichyeo-bwa

Super junior:
Super junior
We are super super superman

Eunhyuk:
Keoki amudo mollachwodo
Me-il chesyeoneul dahae kanda

Donghae:
Nuguda nuguda nuguda haedo
Kiroki marhaejunda

Super junior:
Hamkke keotneun kiri pirok heomnan halchirado
Kyeolguk super junior
The last man standing!

English Translation(latestvideolyrics.blogspot.com):

(bam bam bam bam)

Eunhyuk rap
When i am coolly dancing in the group that’s one of a kind in the world and uniquely moving the world

Donghae rap
All the elfs in the world fall fall fall for me
Run run run to me
Let’s rejoice in this moment together

Yesung:
I (emotionally) touch those people that have genuinely, quietly loved me

Kyuhyun:
There haven’t been moments where i’ve said useless things or not been truthful

Everyone:
Our scale is the best and our scale (english) is the best
Everything has to be the best
Super junior is only missing the ‘man’ from the name of ‘superman’
Our passion is the best and our concentration is the best
Who would be able to say we’ve finished
Super junior is only missing the ‘man’ from the name of ‘superman’

(bam bam bam bam)

Heechul:
Now, now, now, who is it?
(shindong!)

Shindong rap:
So why do all of you look back when i am right here
http://latestvideolyrics.blogspot.com/2011/08/super-junior-super-man-lyrics.html
Who the hell are you looking for
I am shindong

Leeteuk:
Should i pluck the stars for you, count them
One, two, three
With the stars we’ve lost
We are thirteen stars

Everyone:
But we are not lonely, we have sm family and elfs

Ryeowook:
Don’t be disappointed, don’t judge/betray us
You have already become drunk by the super holic

Sungmin:
Try singing the song, and now even follow the dance
Let’s get excited together

Everyone:
Our scale is the best and our scale (english) is the best
Everything has to be the best
Super junior is only missing the ‘man’ from the name of ‘superman’
Our passion is the best and our concentration is the best
Who would be able to say we’ve finished
Super junior is only missing the ‘man’ from the name of ‘superman’

Kyuhyun and sungmin:
When your heart is sad, when you want to listen to a song,
When you need something to lift your spirits up,
We are next to you, let’s all come together

Everyone:
Super junior
We are super junior
We are super super man

Ryeowook and yesung:
When you’re very bored and surfing the internet, if you just type in ‘super’ our results will come come out
We are always by your side
Scream it out
Super junior
We are super super man

Eunhyuk:
Even if they don’t know of us, we try our best every day,

Donghae:
If they question who who who we are, we show them our results

Everyone:
Even if the road we walk is barren,
We are in the end, super junior
The last man standing

Free Felt Patterns and Tutorials: Free Felt Pattern > Valentine Autograph Dog

Free Felt Patterns and Tutorials: Free Felt Pattern > Valentine Autograph Dog: photo by Creative Breathing Valentine's Day autograph dog designed and created by Creative Breathing. Click here for the free pattern.

Free Felt Patterns and Tutorials: Free Felt Pattern > Valentine Autograph Dog

Free Felt Patterns and Tutorials: Free Felt Pattern > Valentine Autograph Dog: photo by Creative Breathing Valentine's Day autograph dog designed and created by Creative Breathing. Click here for the free pattern.

Free Felt Patterns and Tutorials: Free Felt Pattern & Tutorial > Valentines Day Broo...

Free Felt Patterns and Tutorials: Free Felt Pattern & Tutorial > Valentines Day Broo...: photo by Wee Folk Art Valentine's Day pin designed and created by Wee Folk Art. Click here for the free template and tutorial

Free Felt Patterns and Tutorials: Free Felt Pattern > Woodland Squirrel Ornament

Free Felt Patterns and Tutorials: Free Felt Pattern > Woodland Squirrel Ornament: photo by You Go Girl Felt squirrel ornament designed and created by You Go Girl. Click here for the free pattern and tutorial.

Free Felt Patterns and Tutorials: Free Felt Tutorial > Daisy Flowers

Free Felt Patterns and Tutorials: Free Felt Tutorial > Daisy Flowers: photo by Futuregirl Daisy flowers designed and created by Futuregirl. Click here for the free tutorial.

Free Felt Patterns and Tutorials: Free Felt Tutorial > Daisy Flowers

Free Felt Patterns and Tutorials: Free Felt Tutorial > Daisy Flowers: photo by Futuregirl Daisy flowers designed and created by Futuregirl. Click here for the free tutorial.

Free Felt Patterns and Tutorials: Free Felt Pattern & Tutorial > Party Turtles

Free Felt Patterns and Tutorials: Free Felt Pattern & Tutorial > Party Turtles: photo by Ric Rac Adorable party turtles designed and created by Ric Rac. Click here for the free pattern and tutorial.

tooth pillow tutorial, revisited This tooth pillow has a loop to hang from the doorknob or a night table drawer knob, so the Tooth Fairy doesn't have to do the hazardous groping under the beneficiary's pillow. This is pure gold. Pure GOLD, people. So I finished my oldest's tooth pillow (Ballerina Fairy, per request) and I thought I'd repost the basic pattern with a better tutorial to go with it, because I made a couple of adjustments to it. (If you are interested in viewing a boy version, here's my first tooth pillow, the Tooth Officer.) The pattern does not include things like the crown or skirt or accessories. Those are basic shapes you can make yourself with no big problems, hopefully. If you want more inspiration for embellishment you can see these pillows too. The pattern now includes the basic cheek and teeth shapes. So here we go. You'll need: My pattern printed twice on 8.5 x 11 paper or cardstock Felt for tooth, pocket, cheeks, little teeth, and any accessories you add, like the crown and ballerina skirt. Ribbon for the hanging loop Buttons for eyes Fabritac or other fabric glue Matching thread, embroidery floss, etc... Optional pipe cleaners for wings Poly stuffing 1) You've downloaded this New and Improved pattern and printed it out twice on 8.5x11 paper, right? Alrighty. Cut out the teeth and cheek shapes if you want to use them. Cut out the large tooth piece from one sheet and the pocket piece from the other sheet. Also cut out and discard the pocket area from the large tooth piece, so that you create a window. You'll use this to trace the placement of the pocket. Ok? Ok. 2) Trace the tooth pattern twice on felt. If your felt has a more pleasing side to it (like mine did), be sure to flip the pattern over for the 2nd piece. Trace and cut out a felt pocket piece (in my case, I chose light pink*). *Note: Be careful if you choose a darker color for the pocket piece -- it may show through and give your tooth five o'clock shadow. Not good if you are a Ballerina Fairy. 3) Use your window template to trace the placement of the pocket on the wrong side of the front of the tooth with a disappearing marker. Mark the slit for the mouth also. 4) Cut out some felt teeth for the mouth pocket if you like, using the teeth pattern piece included. Glue them centered and aligned with the top edge of the pocket piece. It always cracks me up to think of a tooth that has teeth. 5) Before you cut the mouth slit, I suggest you also straight stitch all around the slit with matching thread to keep the mouth from stretching out (see photo below). (this is a photo of a different tooth fairy pillow, but you can see the stitching around the mouth) 6) Add a line of fabric glue all around the edges of the right side of the pocket. You DO NOT want gaps you could lose your kid's tooth through, so be sure to make a continuous line of glue all around the edge. But not so much glue as to get real gooshy. It's a fine line. Place the pocket on the wrong side behind the mouth using your traced line for placement. Be sure the teeth are centered and showing through the mouth slit. I've also been known to whip stitch around the pocket too, being careful not to show the stitches on the right side, just for added peace of mind. This is what the mouth looks like on the outside after you glue in the pocket. 7) Mark a slit in the back piece for turning. Just a straight line down the middle of the back, about 3 inches long. Straight stitch around it before cutting it, just like the mouth. This makes it easier to work with because the felt edges don't stretch during stuffing. This is something I figured out after doing this tutorial.(In the photos, just ignore the fact that I forgot to cut my slit until after I sewed the tooth together). 8) OK, here is where I differ with a lot of crafters. I like to embellish the face after the tooth is sewn together and stuffed. But if you prefer to do it before, then now is that time. If you want to see the face I did, skip ahead to peek at step 16. Stop here and put on the eyes (if you use buttons, be sure your tooth pillow is not for a kid under three, blah blah blah), cheeks (pattern piece included), eyebrows, and whatever else you'd like to have on your Ballerina Fairy, like pointe shoes. Much easier to do shoes at this stage, right Jess? I skipped the pointe shoes. Too lazy. 9) Place the strap. Make sure the loop is long enough to hang over a doorknob. Center the strap on the back piece as shown and pin in place. Make sure it is out of the way of the seam allowance before you sew. Learned that the hard way. 10) Pin the front and back right sides together with the strap sandwiched in between. On deep curves I find it helpful to trace the seam with a disappearing marker. Experienced sewers may scoff at this. But it sure helps me. Sew a quarter inch seam all the way around the tooth, backstitching to secure. 11) Trim and notch the curves. I just used my pinking shears and trimmed pretty close to the seam so that notching was not necessary except between the tooth roots. At this point I clued in that I'd forgotten to cut the slit in the back, so I had to be very careful not to cut my strap while I did it. 12) Now the fun part: turn it inside out and admire your silly looking deflated tooth. (yours will have a face if you already did that part) 13) Now stuff that baby. You'll notice as you stuff the tooth the mouth will pull open a bit. That's all good. If you get worried about the mouth becoming misshapen with repeated use, you can do like I did and dab the corners with some FrayCheck. I always think of Alex Krycek on X-files when I say that. That's just the wonder that is me. 14) After your tooth is at the ideal poofiness, hand sew the slit in the back together with some matching embroidery floss or thread. 15) If you are making a Ballerina Fairy, you will cut out the felt skirt at this point. It's just a couple of concentric circles, the outside one cut with pinking shears. My skirt was a circle 7 inches in diameter, then I cut another circle out of the center for the waist. To get the size of the center circle, I measured around my stuffed tooth's waist, and it was about 13.5 inches. I'm too lazy (and hopelessly right-brained) to figure out the formula for calculating diameter from circumference, so I took a measuring tape around one of my smaller embroidery hoops, found it was close to 13 inches, and then used it to trace a circle in the middle of my skirt. I cut it out and tested the fit on the tooth, adjusting slightly as necessary. Then I cut another skirt the same size so it would have a double layered tutu look. I glued the two skirts together just around the waistband, then used big basting stitches to attach it to the tooth from the underside, being careful my stitches didn't go through my tooth pocket. 16) Now on to the face for me. Not for you if you already did that in step 8. I attached buttons for eyes and gave her some rosy felt cheeks and embroidery floss eyebrows. Next step was to cut out a little crown shape from gold felt and glue it to the top of the tooth just in front of the strap. Then I stitched it down for security. 17) Last step was the optional wings. I took two silver pipe cleaners and folded them in half, and tacked them onto her back with glue. That didn't look fairy-ish enough, so I added two smaller wings underneath by doing the same thing, only with shorter pipe cleaners. Then I sewed them down with matching embroidery thread. Voila. What's really weird is I found out my good friend Jessica's daughter requested her own tooth pillow Ballerina Fairy at the same time, so our kids must've been channeling from some snaggle-toothed girly collective unconscious. Weirder still, when I found that out by chance, Jessica and I had both already made one unsatisfactory version and were each working on Ballerina Fairy Tooth Pillow 2.0. Creepy. In a good way.


tooth pillow tutorial, revisited

This tooth pillow has a loop to hang from the doorknob or a night table drawer knob, so the Tooth Fairy doesn't have to do the hazardous groping under the beneficiary's pillow. This is pure gold. Pure GOLD, people.

So I finished my oldest's tooth pillow (Ballerina Fairy, per request) and I thought I'd repost the basic pattern with a better tutorial to go with it, because I made a couple of adjustments to it. (If you are interested in viewing a boy version, here's my first tooth pillow, theTooth Officer.)

The pattern does not include things like the crown or skirt or accessories. Those are basic shapes you can make yourself with no big problems, hopefully. If you want more inspiration for embellishment you can see these pillows too. The pattern now includes the basic cheek and teeth shapes.

So here we go. You'll need:
  • My pattern printed twice on 8.5 x 11 paper or cardstock
  • Felt for tooth, pocket, cheeks, little teeth, and any accessories you add, like the crown and ballerina skirt.
  • Ribbon for the hanging loop
  • Buttons for eyes
  • Fabritac or other fabric glue
  • Matching thread, embroidery floss, etc...
  • Optional pipe cleaners for wings
  • Poly stuffing

1) You've downloaded this New and Improved pattern and printed it out twice on 8.5x11 paper, right? Alrighty. Cut out the teeth and cheek shapes if you want to use them. Cut out the large tooth piece from one sheet and the pocket piece from the other sheet. Also cut out and discard the pocket area from the large tooth piece, so that you create a window. You'll use this to trace the placement of the pocket. Ok? Ok.

2) Trace the tooth pattern twice on felt. If your felt has a more pleasing side to it (like mine did), be sure to flip the pattern over for the 2nd piece. Trace and cut out a felt pocket piece (in my case, I chose light pink*).

*Note: Be careful if you choose a darker color for the pocket piece -- it may show through and give your tooth five o'clock shadow. Not good if you are a Ballerina Fairy.

3) Use your window template to trace the placement of the pocket on the wrong side of the front of the tooth with a disappearing marker. Mark the slit for the mouth also.

4) Cut out some felt teeth for the mouth pocket if you like, using the teeth pattern piece included. Glue them centered and aligned with the top edge of the pocket piece. It always cracks me up to think of a tooth that has teeth.

5) Before you cut the mouth slit, I suggest you also straight stitch all around the slit with matching thread to keep the mouth from stretching out (see photo below).

(this is a photo of a different tooth fairy pillow, but you can see the stitching around the mouth)


6) Add a line of fabric glue all around the edges of the right side of the pocket. You DO NOT want gaps you could lose your kid's tooth through, so be sure to make a continuous line of glue all around the edge. But not so much glue as to get real gooshy. It's a fine line. Place the pocket on the wrong side behind the mouth using your traced line for placement. Be sure the teeth are centered and showing through the mouth slit. I've also been known to whip stitch around the pocket too, being careful not to show the stitches on the right side, just for added peace of mind.

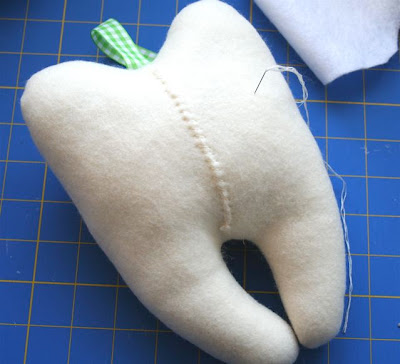
This is what the mouth looks like on the outside after you glue in the pocket.

7) Mark a slit in the back piece for turning. Just a straight line down the middle of the back, about 3 inches long. Straight stitch around it before cutting it, just like the mouth. This makes it easier to work with because the felt edges don't stretch during stuffing. This is something I figured out after doing this tutorial.(In the photos, just ignore the fact that I forgot to cut my slit until after I sewed the tooth together).

8) OK, here is where I differ with a lot of crafters. I like to embellish the face after the tooth is sewn together and stuffed. But if you prefer to do it before, then now is that time. If you want to see the face I did, skip ahead to peek at step 16. Stop here and put on the eyes (if you use buttons, be sure your tooth pillow is not for a kid under three, blah blah blah), cheeks (pattern piece included), eyebrows, and whatever else you'd like to have on your Ballerina Fairy, like pointe shoes. Much easier to do shoes at this stage, right Jess? I skipped the pointe shoes. Too lazy.


9) Place the strap. Make sure the loop is long enough to hang over a doorknob. Center the strap on the back piece as shown and pin in place. Make sure it is out of the way of the seam allowance before you sew. Learned that the hard way.


10) Pin the front and back right sides together with the strap sandwiched in between. On deep curves I find it helpful to trace the seam with a disappearing marker. Experienced sewers may scoff at this. But it sure helps me. Sew a quarter inch seam all the way around the tooth, backstitching to secure.


11) Trim and notch the curves. I just used my pinking shears and trimmed pretty close to the seam so that notching was not necessary except between the tooth roots. At this point I clued in that I'd forgotten to cut the slit in the back, so I had to be very careful not to cut my strap while I did it.


12) Now the fun part: turn it inside out and admire your silly looking deflated tooth. (yours will have a face if you already did that part)


13) Now stuff that baby. You'll notice as you stuff the tooth the mouth will pull open a bit. That's all good. If you get worried about the mouth becoming misshapen with repeated use, you can do like I did and dab the corners with some FrayCheck. I always think of Alex Krycek on X-files when I say that. That's just the wonder that is me.


14) After your tooth is at the ideal poofiness, hand sew the slit in the back together with some matching embroidery floss or thread.


15) If you are making a Ballerina Fairy, you will cut out the felt skirt at this point. It's just a couple of concentric circles, the outside one cut with pinking shears. My skirt was a circle 7 inches in diameter, then I cut another circle out of the center for the waist.

To get the size of the center circle, I measured around my stuffed tooth's waist, and it was about 13.5 inches. I'm too lazy (and hopelessly right-brained) to figure out the formula for calculating diameter from circumference, so I took a measuring tape around one of my smaller embroidery hoops, found it was close to 13 inches, and then used it to trace a circle in the middle of my skirt. I cut it out and tested the fit on the tooth, adjusting slightly as necessary.

Then I cut another skirt the same size so it would have a double layered tutu look. I glued the two skirts together just around the waistband, then used big basting stitches to attach it to the tooth from the underside, being careful my stitches didn't go through my tooth pocket.


16) Now on to the face for me. Not for you if you already did that in step 8. I attached buttons for eyes and gave her some rosy felt cheeks and embroidery floss eyebrows. Next step was to cut out a little crown shape from gold felt and glue it to the top of the tooth just in front of the strap. Then I stitched it down for security.


17) Last step was the optional wings. I took two silver pipe cleaners and folded them in half, and tacked them onto her back with glue. That didn't look fairy-ish enough, so I added two smaller wings underneath by doing the same thing, only with shorter pipe cleaners. Then I sewed them down with matching embroidery thread. Voila.

What's really weird is I found out my good friend Jessica's daughter requested her own tooth pillow Ballerina Fairy at the same time, so our kids must've been channeling from some snaggle-toothed girly collective unconscious. Weirder still, when I found that out by chance, Jessica and I had both already made one unsatisfactory version and were each working on Ballerina Fairy Tooth Pillow 2.0.

Creepy. In a good way.
take from www.mmmcrafts.blogspot.com


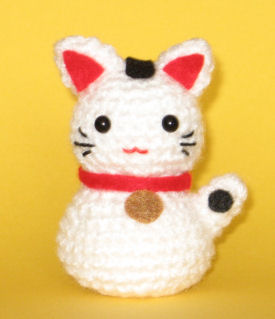
Onni the Beckoning Cat (Maneki Neko) amigurumi pattern


 Onni the Beckoning Cat (Maneki Neko) amigurumi pattern

Here’s an amigurumi pattern for a little Japanese Beckoning Cat, or Maneki Neko. These little cats welcome customers and are thought to bring good luck. “Onni” is a Finnish word/name meaning “luck.”  I tried to simplify the design and add some kawaiiness, hope it was successful. :3
Onni Maneki neko amigurumi pattern
Size: 3.5” (9cm) tall
Notes: End each piece with a slip stitch and leave a long tail for sewing. Stuff evenly, but take care not to overstuff the body; you’ll want the bottom to be flat so the amigurumi will sit level.
Materials needed
Worsted weight yarn (I used Red Heart)
3.75 mm (F) crochet hook
Stuffing
Plastic pellets
Felt
Fabric glue
Embroidery floss
6 mm safety eyes
Head
Rnd 1 – 5 sc into magic ring (5 sts)
Rnd 2 – 2 sc into each st around (10 sts)
Rnd 3 – [2 sc in next st, 1 sc] rep around (15 sts)
Rnd 4 – [2 sc in next st, 2 sc] rep around (20 sts)
Rnd 5 – [2 sc in next st, 3 sc] rep around (25 sts)
Rnd 6-8 – sc around (25 sts)
Rnd 9 – [sc2tog, 3 sc] rep around (20 sts)
Rnd 10 – [sc2tog, 2 sc] rep around (15 sts)
Body
Rnd 1 – 5 sc into magic ring (5 sts)
Rnd 2 – 2 sc into each st around (10 sts)
Rnd 3 – [2 sc in next st, 1 sc] rep around (15 sts)
Rnd 4 – [2 sc in next st, 2 sc] rep around (20 sts)
Rnd 5 – [2 sc in next st, 3 sc] rep around (25 sts)
Rnd 6 – [2 sc in next st, 4 sc] rep around (30 sts)
Rnd 7-9 – sc around (30 sts)
Rnd 10 – [sc2tog, 4 sc] rep around (25 sts)
Rnd 11 – [sc2tog, 3 sc] rep around (20 sts)
Rnd 12 – [sc2tog, 2 sc] rep around (15 sts)
Ears
Rnd 1 — 4 sc into magic ring (4 sts)
Rnd 2 — [2 sc in next st, 1 sc] rep around (6 sts)
Rnd 3 — [2 sc in next st, 2 sc] rep around (8 sts)
Paw and tail
Rnd 1 – 6 sc into magic ring (6 sts)
Rnd 2-3 – sc around (6 sts)
Attach eyes and embroider face on head, then stuff. Put plastic pellets in the bottom of the body for stability, then add stuffing (don’t overstuff). Use your fingers to shape the bottom so it sits flat. Sew body and head together. Sew on ears, paw, and tail. Cut felt shapes for collar, spots, and inner ears; attach with glue.

1500 Free Amigurumi Patterns: Kyuubey amigurumi recipe

1500 Free Amigurumi Patterns: Kyuubey amigurumi recipe: Click here for the free crochet pattern

1500 Free Amigurumi Patterns: Kyuubey amigurumi recipe

1500 Free Amigurumi Patterns: Kyuubey amigurumi recipe: Click here for the free crochet pattern

1500 Free Amigurumi Patterns: Kyuubey amigurumi recipe

1500 Free Amigurumi Patterns: Kyuubey amigurumi recipe: Click here for the free crochet pattern

1500 Free Amigurumi Patterns: Pokemon Mew Amigurumi

1500 Free Amigurumi Patterns: Pokemon Mew Amigurumi: Click here for the free crochet pattern

1500 Free Amigurumi Patterns: Free Hello Kitty Doll Crochet Pattern

1500 Free Amigurumi Patterns: Free Hello Kitty Doll Crochet Pattern: Click here for the free Hello Kitty Crochet Pattern

Sabtu, 14 Januari 2012

macrame rose

make-handmade.com
macrame rose tutorial
mini-e59bf2d8a082.jpg30.jpg

Knotting rose tutorial

To have a Rose including  3   small petals and 5 medium and large petals.
Show the example of the mean.
Threads: a warp thread
  1. 5 thread of 25 cm
  2. 3 threads of 35 cm
mini-b738123418f9.jpg111.jpg
Anchoring warp thread on the pillow.
fasten the thread 5 to 25 cm is better this way.
mini-fbe556cda7ee.jpg222222222.jpg
mini-adc2dc17c098.jpg333333333.jpg
mini-f78bceb1d044.jpg44444444.jpg
Now take a thread of 35 cm and fasten it to the extreme so the thread was shorter by 10 cm
mini-5d09cc2879a0.jpg555555.jpg
mini-85a0c723416e.jpg66666.jpg
Remove the extreme thread in the direction of further knit the long thread, vertical rep breed.
mini-730849d422fc.jpg77777.jpg
mini-fcd9f2996013.jpg888888.jpg
mini-66251fd06265.jpg9999999999.jpg
mini-dfcc53bb03ea.jpg10.jpg
mini-ee7ffa165b83.jpg11.jpg
Making with the threads of 35 cm
mini-768e9f4b951d.jpg12.jpg
mini-2ef7d38d4099.jpg13.jpg
mini-3ce6280b0383.jpg14.jpg
mini-9252bb77288c.jpg15.jpg
mini-6a9d1313d813.jpg16.jpg
mini-c1922888197e.jpg17.jpg
Take the string on the reel fastened to the warp
mini-25c509d1d5e0.jpg18.jpg
along with the tip of the threads on the coil, the entire series
mini-e446accfb29f.jpg19.jpg
mini-ddb8c737e61c.jpg20.jpg
Making with another side.
mini-7b18dfa3c0a3.jpg21.jpg
Now we’ll clean up the threads of 3 in a row. In the thread began to divide
mini-f07d6a400c4f.jpg22.jpg
mini-d593ac41d2ea.jpg23.jpg
mini-7fc23703c86f.jpg24.jpg
mini-f443a48a866a.jpg25.jpg
Thread  on one cut off the tips of the small reserve of 2-3 mm. they need to be careful when you fix knit the next row
mini-4078fbf7f5c6.jpg26.jpg
mini-36db4e611009.jpg27.jpg
The following 3 lines remove only two extreme thread (as well as before this three threads).
mini-a644b39d6f6d.jpg28.jpg
mini-88166e9b9454.jpg29.jpg
Read more: http://rukodelnica.net/news/more/-master-klass-roza-v-tehnike-makrame..html

s